This article is part of a series of articles:
- Forging a Kubernetes cluster in your garage
- Preparing application deployment
- Prometheus grafana deployment in Kubernetes
- Deploying our first application
1. Our application (CI Part)
This is a discord bot creating a quiz. It’s an application written in golang.
Note: This application only connects to APIs, and therefore doesn’t need to receive requests from outside. There is therefore no need to create an ingress access from the internet to our cluster, which simplifies security management.

Application compilation is quite simple:
go mod tidy
go build .
Which translates to the following job in our CI/CD configuration file, the .gitlab-ci.yml:
#.gitlab-ci.yml
buildgo:
  stage: build
  image: golang
  script:
    - go mod tidy
    - go build .
  cache:
    policy: push
    paths:
      - quizzbot
Each CI job runs in a different docker container, and therefore the cache allows saving files and sharing them between different containers, like here quizzbot, the compiled binary of our application.
We package our application in a docker image, which will be our deliverable:
#.gitlab-ci.yml
builddocker:
  stage: publish
  services:
    - name: docker:dind
      command: ["dockerd", "--host=tcp://0.0.0.0:2375"]
      alias: 'docker'
  before_script:
    - docker login -u "$CI_REGISTRY_USER" -p "$CI_REGISTRY_PASSWORD"
  script:
    - docker build -t $CI_REGISTRY/discordquizbot .
    - docker push $CI_REGISTRY/discordquizbot
  cache:
    policy: pull
    paths:
      - quizzbot
(Small disclaimer: the method presented here is old, but I know, I haven’t had too much time to polish this part)
Note: All this part is executed on gitlab.com shared runners, because there is no advantage to using our own resources for this.
2. Terraform deployment (CD Part)

Thing to know: I am a big advocate of terraform, so I will use it, and maybe a bit more than reason.
I will for example use directly the terraform provider for kubernetes where it would have been “prettier” to use helm configurations then execute them with the terraform helm provider, leaving the possibility for anyone to choose to deploy via terraform, or not.
That being said, let’s return to our deployment:
In this part, we declare variables not declared in our gitlab projects, or their parent group (see the chapter Preparing application deployment)
#.gitlab-ci.yml
variables:
  TF_VAR_MINIKUBE_HOST: ${MINIKUBE_HOST}
  TF_VAR_CI_PROJECT_ID: ${CI_PROJECT_ID}
  TF_VAR_CI_REGISTRY: ${CI_REGISTRY}
Here the TF_VAR_ prefix is a way to pass variables to terraform.
For example, the TF_VAR_CI_REGISTRY variable will appear as var.CI_REGISTRY in our terraform code.
On our gitlab group, we added the variable
TF_VAR_KUBECONFIG_MKS8
which contains the path of our configuration file in a format readable by kubectl (see the chapter Preparing application deployment)
Let’s start by running the terraform init command to initialize the execution folder then terraform plan which will validate by connecting to kubernetes that everything is in place for our deployment, without triggering it.
#.gitlab-ci.yml
terraform-plan:
  stage: build
  image:
    name: hashicorp/terraform:latest
    entrypoint:
      - '/usr/bin/env'
      - 'PATH=/usr/local/sbin:/usr/local/bin:/usr/sbin:/usr/bin:/sbin:/bin'
  tags:
    - minikube
  only:
    - main
  script:
    - cd terraform
    - apk update && apk add envsubst
    - cat backend.tf.tpl | envsubst > backend.tf
    - terraform init -input=false
    - terraform plan -input=false -out=plan.cache
the terraform plan will execute on our kubernetes cluster thanks to this:
tags:
  - minikube
minikube is the tag I gave to my gitlab runner when creating it (see the chapter Preparing application deployment)
Everything will execute in the terraform folder of this repo and terraform will use all *.tf files present in this folder
I’ll let you study terraform documentation. We will especially be interested in how to deploy in our cluster.
To get to the essentials, we will configure the terraform provider (driver) for kubernetes, in the provider.tf file
# provider.tf
provider "kubernetes" {
  config_path    = var.KUBECONFIG_MKS8
}
(This is where we pass the path of our kubernetes configuration file to terraform)
Then, we instantiate our application via a module call in the main.tf file:
module "french" {
  source          = "./app_instance"
  MINIKUBE_NAMESPACE        = data.kubernetes_namespace.botspace.id
  CI_REGISTRY               = var.CI_REGISTRY
  DISCORD_TOKEN             = var.DISCORD_TOKEN
}
This module executes what is in the terraform/app_instance folder
and the terraform/app_instance/application.tf file contains our application deployment code:
resource "kubernetes_deployment" "discordbot" {
  metadata {
    name = "discordbot"
    namespace = var.MINIKUBE_NAMESPACE
    labels = {

    }
  }

  spec {
    replicas = 1

    selector {
      match_labels = {
        app = "discordbot"
      }
    }

    template {
      metadata {
        labels = {
          app = "discordbot"
        }
      }

      spec {
        container {
          image = "${var.CI_REGISTRY}/discordquizbot"
          name  = "discordquizbot"

          env {
            name  = "DISCORD_TOKEN"
            value = "${var.DISCORD_TOKEN}"
          }


        }
      }
    }
  }
}
To understand, I refer you to the documentation of the kubernetes_deployment object on the official site
Once the terraform plan is validated, our gitlab pipeline will execute the terraform apply which will apply the modifications.
Here’s what our gitlab pipeline looks like:
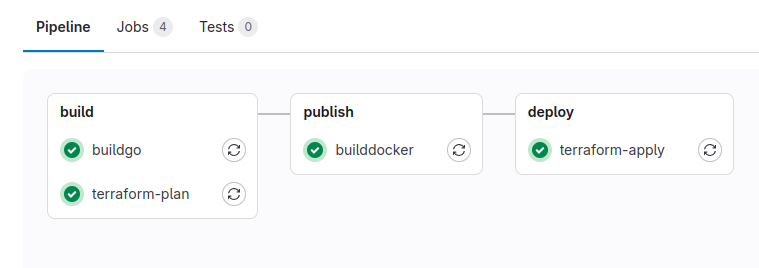
And our container will be started on our kubernetes cluster:
