
In this series of articles, we will explore how to create a Kubernetes cluster “like the big ones”, from scratch, as a homelab. We will include monitoring and automated deployment tools, because just because it’s at home doesn’t mean it has to be DIY!
This article is part of a series of articles:
- Forging a Kubernetes cluster in your garage
- Preparing application deployment
- Prometheus grafana deployment in Kubernetes
- Deploying our first application
1. Hardware
The goal of this demonstration is not to spend a fortune on investments in your homelab.
You can use hardware you already have (which I do in part) or recovered hardware. I decided to invest a bit of money to be able to deploy a number of projects I have in mind, at a lower cost than if I rented resources in the cloud.
We will therefore turn to a good price/quality ratio in terms of number of vcpus/processor threads and RAM.
Aliexpress offers motherboard + cpu + ram kits that are not too expensive, and which allow running quite a few things.
A quick tour on leboncoin allows me to find an SFF format PC at 70€ (8GB RAM, 4 vcpus) and a motherboard kit also from aliexpress, but a bit older with an 8 core/16 thread cpu and 16GB RAM at 30€
A recovered nvidia GTX 1650 ti graphics card with 4GB RAM and another basic one (<20€ on aliexpress) come to manage the video of our servers
So if I summarize:
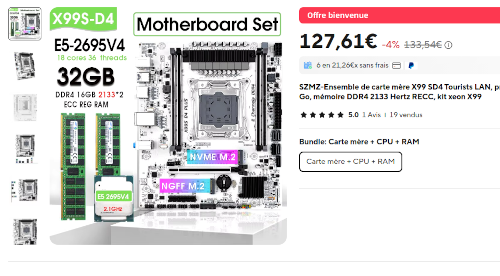
- a MB + CPU + RAM kit with 18 cores/36 threads and 32GB RAM (126€)
- a MB + CPU + RAM kit with 8 cores/16 threads and 16GB RAM (30€)
- a basic graphics card (20€)
- an nvidia GTX 1650 ti card for AI needs (40€)
- a 256GB NVMe SSD (23€)
- a recovered SATA SSD
- a basic desktop PC (70€)
- 2 600W power supplies on amazon (2 x 24€)
- 2 recovered cases graciously given by emmaüs near me (yes yes, thanks to them!)
so, without counting the desktop PC which will be there to have a quorum of 3 machines, we have:
- 52 vcpus
- 48GB RAM
- 4GB graphics RAM for AI
For a total of about 360€, which remains quite reasonable.
2. Environment preparation
a. Linux installation

Nothing very specific here, we will install ubuntu 24.04 (latest LTS version to date) via a usb key
We will take the server installation without graphical display
Ubuntu remains the easiest distribution to install and operate.
I won’t detail Ubuntu installation here, or even how to create a bootable usb key, because if you’re reading this, you’re capable of finding out how to do it.
b. NVIDIA drivers

We will also install NVIDIA cuda drivers on our server with the GTX card for our GPU-requiring apps.
On this same server, we will need to install NVIDIA graphics drivers, as well as NVIDIA Container Runtime which will serve Kubernetes to launch containers having access to the cuda cores of the graphics card.
Small note: Make sure to choose the same installation method for the different packages, and if not, try to find compatible versions.
I pulled my hair out a bit to make all this work, having had the case where the installed kernel modules differed from the driver version, as well as from that of the nvidia-utils package.
But well, it’s manageable.
c. Kubernetes deployment and cluster configuration

The goal is not to bother too much with managing our cluster. We will therefore go with a simple distribution, microk8s.
Kubernetes installs from packages via snap. a simple snap install microk8s --classic is enough to install kubernetes.
It can be used both as a Minikube locally on a single machine, or as a node of a multi-machine kubernetes cluster.
This second option is what interests us.
We will therefore go on each of the 3 servers and run the command
sudo snap install microk8s --classic
Then, on one (and only one) of the machines, we will run the following command:
$ microk8s add-node
which responds:
From the node you wish to join to this cluster, run the following:
microk8s join 192.168.1.xx:25000/<redacted>/xxxxxxxxxxxxx

Use the '--worker' flag to join a node as a worker not running the control plane, eg:
microk8s join 192.168.1.xx:25000/<redacted>/xxxxxxxxxxxxx --worker

If the node you are adding is not reachable through the default interface you can use one of the following:
microk8s join 192.168.1.xx:25000/<redacted>/xxxxxxxxxxxxx
microk8s join 192.168.xx.1:25000/<redacted>/xxxxxxxxxxxxx
microk8s join 172.17.0.1:25000/<redacted>/xxxxxxxxxxxxx
microk8s join 2a0x:e0a:a50:fxc0:bacx:xxxx:xxxx:xxxx:25000/<redacted>/xxxxxxxxxxxxx
We will therefore go to one of the two other machines to run
microk8s join 192.168.1.xx:25000/<redacted>/xxxxxxxxxxxxx
(I specify that we want all nodes to support the kubernetes control plane)
The second machine will then appear in the same cluster as the first.
We then need to run $ microk8s add-node again on the first machine and associate the third machine in the same way with the generated microk8s join .... command
If all goes well, the three machines will appear in the cluster:
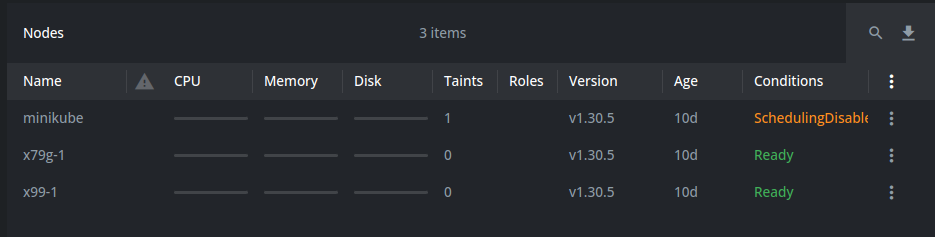
Note that I disabled the small machine, named “minikube”, leaving apps running on the other two machines only
I use Lens desktop which is free in its base version, and largely sufficient to manage a kubernetes cluster.
To retrieve the kube cluster configuration to use it in Lens or in the deployments of the next step, run this command on the first machine: microk8s kubectl config view --raw
Copy the command output into a kubeconfig file
One last command to run:
microk8s enable gpu
This will enable GPU access on our machine with the nvidia card